Vertical Remixing Implementation Post Mortem

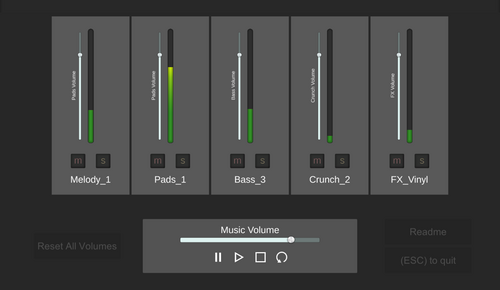
After the composition was done and every variation of each instrument was rendered separately into separate sounds it was now time to head over to FMOD and Unity to put all the pieces together. To reiterate, the goal was to playback each variation randomly, creating new combinations every loop. If that was the only goal, then the implementation would be very simple. However, I wanted the player/listener to be able to interact with the music so they could really get a feeling for what was going on. The way I decided to convey this information was to have a track dedicated to controlling and displaying information about each variation organized by instrument. Practically this means that I have 5 tracks; one for the Melody, one for the Pads etc.
Each track displays the name of each variation playing, so the Melody track will display “Melody_1” when the Melody_1 variation is playing and so on. As well, the tracks display the volume output of each variation so that there is a visual representation of each variation. Finally, each track has volume, mute, and solo controls so that the listener can experiment and really get a feeling for how the whole event is put together.
For this project the work within FMOD started with naming each asset. Because I will be manipulating the sound names of each asset in order to change the name of the variation displayed in Unity, I needed to make sure they all used the correct naming convention. I also ended up having to add new assets that I used as silence, for reasons explained later. To set up the music event I created five tracks for each instrument and put a multi-instrument on each one, putting each variation of the respective instrument into each instrument. So the Melody track has a multi-instrument with each Melody variation and so on. Next I routed each track in the event to its own bus, and turned the master volume on the event down to zero. This is so that I can control, measure, and display the output of each track independent of the whole event.
The final bit of work in FMOD was to take care of the reverb tails. This was actually an interesting problem given the random nature of the event. Normally I bake the reverb tail when exporting the music from my DAW. However, because each loop will be different my normal way doesn’t work here. So instead, in FMOD I utilized transition timelines. By setting a marker at the beginning of the event, and putting a transition marker at the end of the event I used transition timelines to blend the reverb tail of each track into the start of the loop. This was the last step in FMOD, time to move onto Unity!
I first set out to set the name of each track in Unity. To do this I first needed to grab the name of each sound being played. To do this I accessed the SOUND_PLAYED Callback Event. This Callback Event allows you to access information about the sound that was played, including the name. I then had a dictionary that used the first letter of the sound name as the key to set the value, and set the name of each track based on the value in the dictionary. This is the reason that I had to name each track correctly. One note is that the SOUND_PLAYED callback event does not trigger if you use silence instruments or set a track to -∞ dB. This is the reason I had to add random assets, name them Instrument_Silent, and set their volume to -79 dB. If I didn’t want to display the names of each track this would not have been necessary, I could’ve just used a Silence Instrument.
I then needed a way to monitor and display the output of each track in the event. Because I routed each track into its own bus, I was able to use FMOD’s DSP chains to accomplish this. FMOD uses Digital Signal Processor chains to control and direct how audio moves behind the scenes. If you add effects to a bus in FMOD, a new DSP is added that processes the audio. So if you add Reverb to a bus, it creates a new Reverb DSP that gives the sound reverb. Every bus comes with a basic volume DSP, and you can access the current loudness from this DSP. From there I’m able to attach the peak level from the output of each bus to its own slider, where the volume levels control the value of the slider. For the Crunch and FX buses I multiplied the output some, as they are much quieter than the other tracks and it made for a display that looked a little weird.
As for controlling the music, the fact that I only ever have one event playing made controlling the playback simpler than my demo reel project which used multiple events. For the mute and solo controls, I ended up setting the volume instead of using FMOD’s mute function, as I sometimes got popping noises when muting using the .SetMute() method, but didn’t experience any popping when using .SetVolume().
Files
Get FMOD | Unity Demo - Vertical Remixing
FMOD | Unity Demo - Vertical Remixing
Exploring vertical music structures in games
| Status | In development |
| Author | Kyle Waldon |
| Tags | audio-implementation, personal-project |
More posts
- Vertical Remixing Composition Post MortemDec 19, 2021

Leave a comment
Log in with itch.io to leave a comment.